6. Narrative User Interface
Apps on KBase, such as genome assemblers and annotators that run on narrative pages, are created using the KBase SDK.
The user interface (UI) that users see in narratives and in the app catalog are defined in two files:
spec.json and display.yaml. These two files are in a directory called ui/narrative/methods/run_{username}{module_name}
where {module_name} is the name of the repository that you want to turn into an app. In the example module,
the directory ui/narrative/methods/run_{username}ContigFilter exists and you need to create a directory called
ui/narrative/methods/run_{username}ContigFilter_max.
Note
For historical reasons, in the user interface, methods, modules and apps are synonymous.
View Narrative App UI Specification for more information and options.
6.1. Update spec.json
Copy the directory named ui/narrative/methods/run_{username}ContigFilter and create a directory for the new app.
# From your module's root directory:
$ cd ui/narrative/methods/
$ cp -r run_${username}ContigFilter run_${username}ContigFilter_max
run_{username}ContigFilter_max matches the funcdef name we used in the KIDL {username}ContigFilter.spec file.
Now open up ui/narrative/methods/run_{username}ContigFilter_max/spec.json. This file defines a mapping between our
KIDL .spec file and how our parameters will show up in the app’s user interface.
In the section under parameters, there are two input parameters:
{
    "parameters": [
        {
            "id": "assembly_ref",
            "optional": false,
            "advanced": false,
            "allow_multiple": false,
            "default_values": [ "" ],
            "field_type": "text",
            "text_options": {
                "valid_ws_types": [ "KBaseGenomeAnnotations.Assembly", "KBaseGenomes.ContigSet" ]
            }
        },
        {
            "id": "min_length",
            "optional": false,
            "advanced": false,
            "allow_multiple": false,
            "default_values": [ "" ],
            "field_type": "text",
            "text_options": {
                "validate_as": "int",
                "min_integer": "0"
            }
        }
    ]
}
These options will generate UI form elements in the narrative that allow the user to input data into your app.
We leave out the workspace_name parameter because it will automatically be provided by the system,
not the user, so we don’t need a form element for it.
Each parameter object has a number of options.
We want both parameters to be required (“optional”: false)
We want the
assembly_refto be a reference to either an Assembly or ContigSet object (view the type catalog ) to see all KBase types)We want the
min_lengthparameter to be validated as an integer, and we don’t want to allow negative numbers (minimum valid integer to be 0).
Edit the file to add the other input parameter max_length with similar values. The end of the parameters section should have something like this.
[
    {
        "id": "min_length",
        "optional": false,
        "advanced": false,
        "allow_multiple": false,
        "default_values": [ "" ],
        "field_type": "text",
        "text_options": {
            "validate_as": "int",
            "min_integer" : 0
        }
    },
    {
        "id": "max_length",
        "optional": false,
        "advanced": false,
        "allow_multiple": false,
        "default_values": [ "99999999" ],
        "field_type": "text",
        "text_options": {
            "validate_as": "int",
            "min_integer" : 0
        }
    }
]
Notice that a comma was added to the end of the min_length parameter.
Below parameters, in the section under behavior, change run_{username}ContigFilter to run_{username}ContigFilter_max. Note that name is the name of the module and doesn’t change and method is the name of the app.
{
    "service-mapping": {
        "url": "",
        "name":"{username}ContigFilter",
        "method": "run_{username}ContigFilter_max"
    }
}
Also in the behavior section, you will see input_mapping options. It contains entries for the input
parameters.
{
    "input_mapping": [
        {
            "narrative_system_variable": "workspace",
            "target_property": "workspace_name"
        },
        {
            "narrative_system_variable": "workspace_id",
            "target_property": "workspace_id"
        },
        {
            "input_parameter": "assembly_ref",
            "target_property": "assembly_ref",
            "target_type_transform": "resolved-ref"
        },
        {
            "input_parameter": "min_length",
            "target_property": "min_length"
        }
    ]
}
Notice that we added a target_type_transform option with the value resolved-ref for
assembly_ref. This indicates to the narrative that this parameter needs to be a valid reference
to an object in the workspace.
Add the max_length to the input_mapping. The lines will look something like:
[
    {
        "input_parameter": "min_length",
        "target_property": "min_length"
    },
    {
        "input_parameter": "max_length",
        "target_property": "max_length"
    }
]
Make sure you include the commas after the min_length parameters to maintain valid JSON syntax. We don’t need to change the output section.
When you make changes to UI files, you can validate the syntax of your changes by running:
$ kb-sdk validate
When you run kb-sdk validate, you will get an error about your display.yaml, which we will update next.
6.2. Update display.yaml
The YAML file found in ui/narrative/methods/run_{username}ContigFilter/display.yaml holds text content for your app. The text written here will show up in the narrative and in the App Catalog
for each form element. You only need to set this text for parameters that actually display in the form.
Note
Compare these screenshots of the narrative and App Catalog images of the app “View flux network” with
the specifications in its display.yaml file . If screenshots are included, they appear between the tooltip and the description.
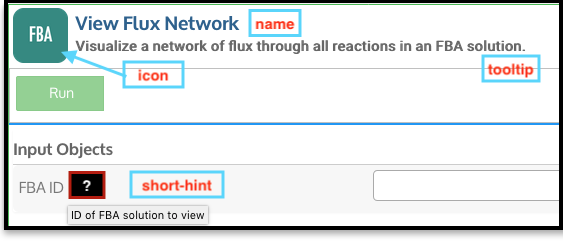
View Flux Network App in a narrative.
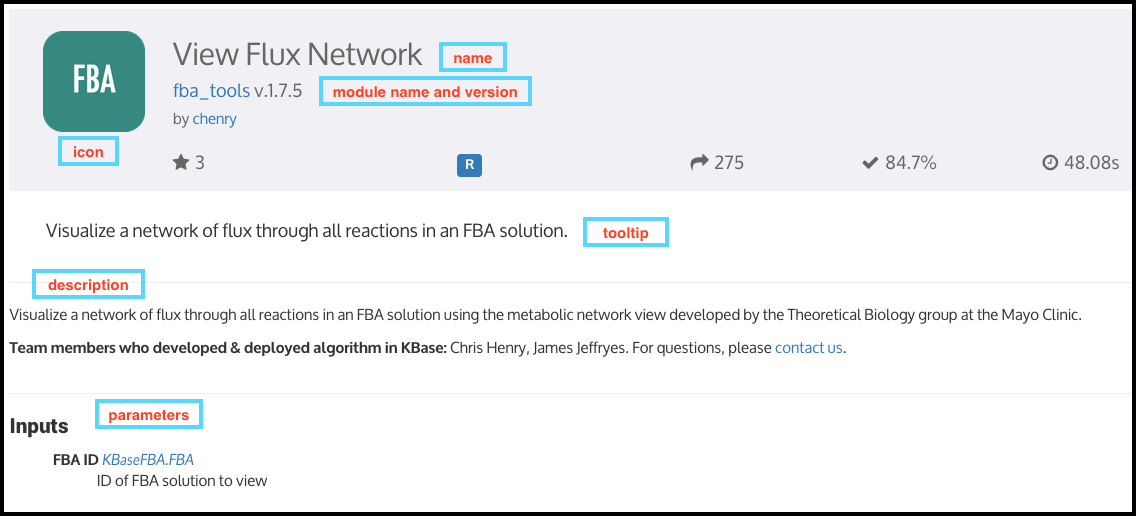
App Catalog for View Flux Network.
Open the display.yaml and update its name and tooltip to say something related to filtering assembly files
based on contig length with both a min and a max filter.
You can leave the “screenshots”, “icon” and “suggestions” fields to their default values.
Tip
The icon is completely optional but will come in handy when you get to the “Publish and Update” step. It will help you find your app in a sea of others that have the same name. The Narrative App UI Specification has more information on icons.
Moving down to the “parameters” section, the parameter entries for “assembly_ref” and “min_length” are filled in.
parameters:
    assembly_ref:
        ui-name: |
            Assembly
        short-hint: |
            The assembly to filter (will be overwritten)
    min_length:
        ui-name: |
            Min Length Threshold
        short-hint: |
            All contigs below this length will be removed
Edit the file and add the max_length parameter. The new lines might look like:
...
    max_length:
    ui-name: |
        Maximum contig length
    short-hint: |
        Maximum required length of every contig in the assembly
...
Finally, run kb-sdk validate again and it should pass! Now we can start to actually work on the functionality of the module and its apps.
Note
For a more exhaustive overview of the spec.json and display.yaml files, take a look at
the Narrative App UI Specification You can also experiment with UI generation
with the App Spec Editor Narrative